Tuesday, 20 August 2013

Blogger platform is simple and easy to use. There are numberless third party templates available in the blog-o-sphere. You can use any template to give your blog a professional look. But if you are using blogger’s default templates then you definitely notice that there is a navbar (navigation bar) at the top of your blog. This navbar looks nasty and it shows that this is not a website but simply a free blog. It will ruin your efforts to convert your blog into a professional blog. So, at that time you may think to remove navbar from your blogger blog. Don’t worry I have the solution of your problem and it is very easy to remove the navbar. Let’s start the tutorial.

Remove Navbar from Blogger Blog

There are two methods by which you can remove navbar from your blog. First by hiding it using CSS and second one is by disable it from blogger layout. Let see both the methods.

Hide Navbar Using CSS

  1. Go to Blogger >> Template >> Edit HTML
  2. Please Backup your blog template first. (Read this: How to backup template in blogger?)
  3. Search for
  4. ]]>
  5. Now paste the below code just above it.
  6. #navbar-iframe { display: none !important;}
  7. Click save template button.
  8. You are done!

Disable Blogger Navbar

If you don’t want to put additional CSS code in your blog template then you can also remove navigation bar by using below method.
  1. Go to Blogger >> Layout
  2. Now click on edit under the navbar section. See below screenshot.
  3. remove blogger navbar
  4. A Navbar Configuration pop up will open. Choose “off” from the various options.
  5. disable blogger navbar
  6. Click on save button.
  7. You are done! 
Now follow simple steps below and change your blog's background color or image:

  • Go to Blogger >> Template >> HTML >> Proceed
  • Search for body and you'll find something similar code like below image
blogger background image
In above image you can clearly see that an image has been used as a background in the body selector. The body selector is a default selector in CSS responsible for the entire document. Now you can delete the existing image and add your own image for background. However, if you want to remove the picture and want to add simple colors then remove the all image address including the parentheses like this: ("http://were...wrerwer.e..ewr.wer.we..r.jpg"), delete the whole thing and replace it with a color name like red, blue, brown, green etc visit this page for color codes and names: click here 

Also check below screen shoot for another example of finding BODY selector in your blog's template and its properties: 
blogger background color
In above image instead of background image a simple color has been used and you can easily change it with whatsoever color you want. Just visit a given link in previous paragraph and find a huge number of color codes and names. In above screen shoot the #104E8B is a color code and you'll just have to replace that with your desired color. After changing the code with yours must save the template and view your blog for seeing the changes. 
If you have original and SEO friendly content in your blog, then no doubt you can surely get high ranking in search results. Writing SEO friendly blog posts is not much tough as beginners think. We just need to focus on some places where we can add keywords in our blog posts to make them optimized for search engines. Don’t forget, optimizing blog posts for search engines is not mean to compromise with content quality. We have to add keywords in a proper way so that it looks natural for our readers and for search engines too. I’ll outline 6 best locations to add keywords in blogger blog posts. Hope you would like to know them.


Optimize Blog Posts By Adding Keywords Smartly

Before I cover today’s topic, you must need to know that adding too much keywords in blog posts is not good for our blog health. We should keep it’s density below 3% for better optimization of our blog posts.
The locations I’m going to tell you to add keywords are the safest and best locations of our blog area. If you want to get your blog posts rank high in search results, then don’t miss to target below locations:

1# Starting and Ending Para of Content

Whenever you write new post for your blog, always remember to add your main keyword in first and last paragraph of your content’s. Both the locations are best for this purpose and search engines also look for keywords in these two places to decide the ranking of our blog posts.
We can add more targeted words in the form of phrases between the content to make it more SEO friendly.
Note: Don’t use same words again and again. Better to use multiple and relevant words. Using multiple related word not only protect our content from keyword stuffing penalty but also help it to appear high with multiple search terms. 

2# Image Name, Alt Tag and Title Tag

We all know that images plays best role in explanation of the topic. But using images we can also optimize our blog posts even better.
We just need to optimize our images before inserting them into our posts. The better we optimize the images, the better our posts will optimize for search engines. Read below mentioned post to know best 6 ways to optimize images.
If we talk about adding targeted words in blog posts using images, then let me tell you that image’s name, title tag and alt tag are the best and prominent places.

3# Title Of Our Posts

Our post titles are the top most places to add our targeted keywords. You may listen that we should use catchy post titles to attract more readers. But with catchy post titles we should also remember to add our keywords there.
Meaningful post titles grab more audience. Not only from social sharing sites, but from search engines too.
So, always try to use meaningful and catchy post titles to boost your posts traffic.

4# Permalink of Posts

Permalink is the URL of our blog posts. It’s a killer location to add really targeted keywords.
By default, permalinks create on the basis of our post’s titles. But we can use our custom permalinks to add our keywords.
To add custom permalinks go to your Post Editor > click on Permalink from the right side menu and choose Custom Permalink. Add your main keywords there and press Done button.
optimize blog posts
Note: Always try to use only targeted keywords in permalinks. Other non important words should be ignored.

5# Post Labels

Post labels not only used to categorize our blog posts. If used smartly then we can take their benefits to optimize our blog posts too.
Stop using non keyword rich names for your labels. Named them correctly and put your really targeted words there.
If you had forgetten to insert your keywords in label’s name, then don’t worry. We can rename them too. 

6# Post Comments
Many bloggers are unaware with this trick that we can use our blog comments too to add some keywords in our blog posts.
Yes, you heard it right. There are lot of benefits of blog comments and if we use them effectively then no doubt we can get higher ranking in search results.
Whenever you reply your reader’s comment on your blog, try to add some keyword phrases in your reply in a natural way that looks obvious while reading.
Note: Instead of adding your focused words try to use some long tail keywords in your comment section. In that way you can improve your keywords ranking 
Search Engine Optimization (SEO) is the most important thing to learn for best blogging experience. Without proper blog optimization, we can’t even dream to get impressive traffic from search engines. From past few days, I am getting too much request of newbie bloggers to share some On-Page SEO Tips. That’s why today I plan to mention all those On Page SEO tips which I already shared on my blog in my earlier posts. I’m sorry if you have read those posts before, but I need to grab attention of newbie bloggers who just start learning SEO for their blog. All those tips are must to know by every blogger. So, let’s take a look on best On-page SEO Tips for Blogspot Blogs and if you have read them before then don’t ignore this post. May be you learnt something new which you ignore before because of any reason.
On Page SEO Tips

On Page Search Engine Optimization Tips For Blogspot

Below are the tips and tricks that will be beneficial for you to optimize your blog for Google and other search engines. Read them carefully and apply all of them on your blog to make your blog lovable and trust worthy for search engines.

Custom Robots Header Tags

There are some settings for bloggers that they can personally do for their blogs to make their blogs for SEO friendly. Custom Robots Header Tags setting in one of them. It’ll be beneficial for you to use custom robots headers tags correctly. It’s easy to manage these settings. Just take a look at below tutorial.

Custom Robots.txt

Search engine bots like Googlebot (Web Crawling Robot of Google) needs some guidelines on how they have to crawl and index our blog. We can prevent some non important pages labels pages from indexing in Google to protect our blog from duplicate content issues. Got confused? Check out below tutorial which will clear all of your confusions.

Optimize Blog Post Titles

If you just started your blog on blogger’s default template, then definitely you’ll not be aware with this fact that your post titles are not properly optimized for search engines. You need to do some editing in your blog template to make your post titles properly optimized. You will see a noticeable change in organic traffic of your blog after making this change. Follow the instructions given in below mentioned post.

Image Optimization

You may definitely notice relevant images between the posts on many blogs. Images not only enhance the look of our content, but it also plays an important role to optimize our blog posts. If we make effective use of images in our blog posts, then we can attain extra traffic from search engines. Follow below post to learn more on image optimization in blogger.

Internal Linking SEO

Many bloggers fail to optimize their internal links or even they don’t link their posts to each other internally. This is really a big mistake that we must avoid. Internal linking not only increases our blog page views but also help our posts to rank well in search engines. If you are also doing the same mistake, then you must need some tips to optimize your internal links.

Search Engine Submission

When we are ready with our blog optimization, then we need to submit our blog in Google’s webmaster tool. Verifying and submitting our blog in Google webmaster tool helps it to get indexed in Google super fast. It also tells about our blog issues like broken links, HTML improvements etc that we must try to resolve. We just need to verify our blog ownership and submit a sitemap. That’s it. If you have not added your blog GWT, then I recommend you to read below tutorial.

Improve Your Blog Load Time

If your blog takes lot of time, then visitors will go back and never come back again. It will increasebounce rate of your blog and you’ll lose your valuable traffic. Search engines give more value to fast loading blogs because they want to build best user experience. That’s why it’s very important to optimize blog loading time. I have shared some best tips that can help you to enhance your blog’s loading speed.
Every blog or website owner must think about the strategies to increase its usability and value for both to the readers and search engines as well. Providing regular unique and original content to the readers is must to rank well in search engines and to achieve your blogging goals. But increasing its value is the crucial thing. As we all know that Google’s ranking algorithms are going hard to follow day by day. Search Engine Optimization has changed its meaning and usage in past years. Today, we need to focus on maintaining usability of our blog to protect it from losing its value in the eyes of major search engines. We need to build best quality backlinks to stand out our blog from the crowd. There are lot of techniques to increase blog readership and value to gain trust of the readers and search engines as well. In today’s post I’ll discuss about one of the techniques that is internal linking and its benefits.

Advantages of Internal Linking

There are numerous benefits of internal linking in SEO and we will go through from them one by one. But before telling you the benefits of it let me tell you what does internal linking means?

Internal linking is the technique of Search Engine Optimization to link one post to another in such a manner that increase blog or website’s usability to the readers and provide them more relevant content to read.
Now you have understand what does internal linking means, so let see it’s advantages in SEO.

Increase Readership

Increase Blog Readership
Linking to internal posts is the best way to increase readership around the blog. If You write a post and provide top quality internal links with proper use of anchor texts then your readers feel easy to navigate your site from one post to another. You help them to reach that location of your blog where they want to go for more information they are looking for hence better readership of your blog.

Increase Page Rank

Increase Pagerank
Internal linking is the best method to increase link popularity. It passes link juice from one post to another in the form of links which seems like a vote to the linked post that helps it to gain Google pagerank and rank well in search engines. By this process page rank flow completely in your blog and all posts that help them in gaining strength to stand out and bring more traffic from search engines. It also increases number of backlinks to all posts that help them to increase their rank.

Better Crawling and Indexing

Web Crawling
You may heard that search engine crawlers are known as spiders. This is the main reason to call them as spiders because they like content interlinked with more relevant content. As linking to related posts helps readers to find the information more quickly and easily, it also help web crawlers to crawl and index all of your content by providing a convenient path to follow.

Decrease Bounce Rate

Decrease Bounce Rate
Last but not the least benefit of internal linking is it decrease your blog bounce rate without doing any extra hard work. You just provide links to more relevant posts and readers click those links to read more content. It automatically increase blog page views and reduce bounce rate that is must for every blog to build trust in the eyes of search engines. less bounce rate shows the authority and usability of a blog. 
Almost every blogger or webmaster uses Automatic read more with thumbnail feature in their blog because it add more functionality and give a professional look to the blog. Beside this it has many advantages like it shows only post summary (excerpt or snippet) with thumbnail on the blog homepage, labels and archive page that increase your blog page views, it help to reduce blog load time of your blog by reducing the long lengthy posts into a short summary with first image of the post at homepage. It also help to reduce bounce rate of blogger blog because if reader is interesting to read the full post then he/she have to click on read more link hence less bounce rate. As you know now the benefits of adding read more link into blogger, let see how to add it with very simple steps.

Add Auto Read More To Blogger

  1. Go to your Blogger Dashboard > Template.
  2. Backup blog template to prevent the template by any crash during making changes to add read more.
  3. Click Edit HTML > Proceed.
  4. Check Expand Widget Template checkbox.
  5. Press Ctrl+F and find the below code in your template.
  6. and paste the below code just above / before it.

  7. Now search and replace it with the below code.


  8. Read More


  9. Now preview your template and save.
Customization:  Below are some customization tips that you can do in the first code to achieve the following results.
  1. showImage: true, This code will show summary with thumbnail. If you don’t want to show thumbnail then change true to false.
  2. imgFloat: ‘left’, To change image location replace left with right.
  3. imgWidth: 120, imgHeight: 90, Default width and height of the thumbnail. Change these values according to your need.
  4. defaultThumb: ‘https://blogger.googleusercontent.com/img/b/R29vZ2xl/AVvXsEgTcVrO-peDX6zi8b16hnAACyDBnFn-2w3urD0klJ2VIpux6cDspKDWo5UsMNtDgLlAS0LEtm_S6Y-K4h9jWUPIx5ERyG3pVwfZjQ7v0vz37rUq9rhSLPQnEAXMDVO34hHoxZYFOksCrH4/s1600/no-thumb.jpg’, If there will no any image in the post then the default image will be show as a thumbnail. You can change it by replacing it with your own image url.
  5. words: 65, No of words shown along with thumbnail.
  6. wordsNoImg: 80, No of words without thumbnail.
  7. skip: 0, If you not want to show read more on some starting posts then change 0 with no. of posts. For example if you change 0 with 2, then read more function will not work for first 2 posts.
  8. showHome:true,Change true to false if you don’t want to show read more on Homepage.
  9. showLabel:true,Change true to false if you don’t want to show read more on Label Page.

Output

Once you save your template, visit your blog. The read more link with thumbnail will look like this:
auto read more

Are you going to make changes in your blogger blog template or going to include some extra HTML, CSS or JavaScript code to add more functionality to your blog like post views counter or any other widget? If yes, then wait for a minute. By saying wait, I mean you should do something before making any changes. If you don’t want any template crash during customization, you should definitely make a backup of your template in your PC. By storing a backup file, you can revert to original template if there is any mess up with your blog template during tinker with the code. It will also prevent you from losing all your hard work and precious time which you denote to design your blogger template. If by mistake you do something wrong with your template during make changes, then you will be able to go back in the previous stage easily. Now you are clear with the importance of keeping a backup file. So, let see how to backup and restore template in blogger new interface.

Note: Always make a habit of backup your blog template if you are planning to do editing in your blog template.

Backup Blogger Template

  1. Open your blogger dashboard.
  2. Point to your blog menu and select template.
    blog template
  3. Press Backup/Restore button located at the top right corner.
    backup restore button
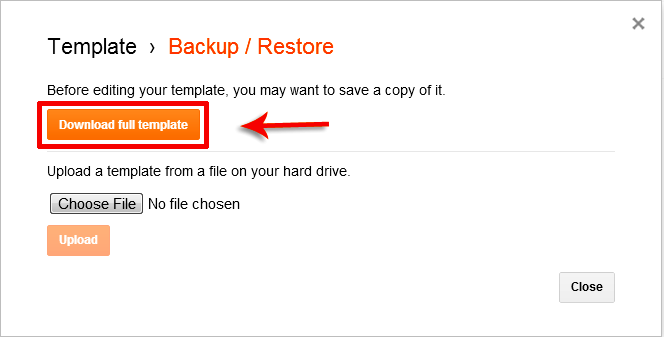
  4. Click “Download full template” button.
    download template
  5. Done!
Now you have successfully store a template backup in your PC. Keep it in a safe place where you remembered it. So that, when required you restore it without any headache. Now, let see how to restore a template.

Restore Blogger Template?

Restoring a blogger template is also as easy as backing up. Let see how to do it.
  1. Repeat step #1 to #3 that you do while backing up your template.
  2. Click on Choose File button.
  3. Select your backup template from the location where you keep it.
    Tip: It will be an .XML file
    upload template
  4. Now simply press the Upload button and you have done.