Showing posts with label Blogger Guide. Show all posts

Wednesday, 21 August 2013

Add Contact Form on Blogger


  • Login to Blogger > Dashborad
  • Click on Drop Down Menu and select Layout
  • Add Gadget
  • Click on More Gadget
  • Select Contact Form

add contact forum in blogger

  • Now Give a Name to your Contact Form as we recommend you should give Contact Form
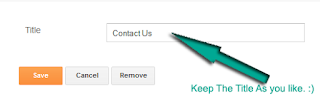
add contact forum in blogger


Now save it.


Customize Contact Form


  • login to Blogger > Dashborad
  • Click on Drop Down Menu and select Template
  • Backup your Template before making any changes to your blog
  • Now Search for </head>
  • Paste below code just before </head>


<style>/*---- Compatible contact Form by TTH -----*/.contact-form-name, .contact-form-email, .contact-form-email-message { max-width: 220px; width: 100%; font-weight:bold; }      .contact-form-name { background:#FFF url(http://2.bp.blogspot.com/bNZePDihTPU/UZ-lhWAHXqI/AAAAAAAAJuo/aSVVE_A6HpE/s320/name.png) no-repeat 7px 8px; background-color: #FFF; border: 1px solid #ddd; box-sizing: border-box; color: #A0A0A0; display: inline-block; font-family:Arial,sans-serif; font-size: 12px; font-weight:bold; height: 24px; margin: 0; margin-top:5px; padding: 5px 15px 5px 28px; vertical-align: top;}      .contact-form-email { background: #FFF url(https://blogger.googleusercontent.com/img/b/R29vZ2xl/AVvXsEhKRdXPw7KQ2J3qRkx_Etrm49SmolQEqlIuitAzgS4BV65T5aRkp2kaE8GJS5T7kXExhmCucqNWJp8vSUDXH9i-U_arzctNL02N5RH1zZwzCojURkxtQ0wtaRQEYaJ1CzEzgK8StNO7haY/s320/email.png) no-repeat 7px 10px; background-color: #FFF; border: 1px solid #ddd; box-sizing: border-box; color: #A0A0A0; display: inline-block; font-family: Arial,sans-serif; font-size: 12px; font-weight:bold; height: 24px; margin: 0; margin-top: 5px; padding: 5px 15px 5px 28px; vertical-align: top;}.contact-form-email:hover, .contact-form-name:hover{ border: 1px solid #bebebe; box-shadow: 0 1px 2px rgba(5, 95, 255, .1);padding: 5px 15px 5px 28px;}.contact-form-email-message:hover { border: 1px solid #bebebe; box-shadow: 0 1px 2px rgba(5, 95, 255, .1); padding: 10px; }.contact-form-email-message { background: #FFF; background-color: #FFF; border: 1px solid #ddd; box-sizing: border-box; color: #A0A0A0; display: inline-block; font-family: arial; font-size: 12px; margin: 0; margin-top: 5px; padding: 10px; vertical-align: top; max-width: 350px!important; height: 150px; border-radius:4px; }.contact-form-button { cursor:pointer; height: 32px; line-height: 28px; font-weight:bold; border:none; }.contact-form-button { display: inline-block; zoom: 1; /* zoom and *display = ie7 hack for display:inline-block */ *display: inline; vertical-align: baseline; margin: 0 2px; outline: none; cursor: pointer; text-align: center; text-decoration: none; font: 14px/100% Arial, Helvetica, sans-serif; padding: .5em 2em .55em; text-shadow: 0 1px 1px rgba(0,0,0,.3); -webkit-border-radius: .5em; -moz-border-radius: .5em; border-radius: .5em; -webkit-box-shadow: 0 1px 2px rgba(0,0,0,.2); -moz-box-shadow: 0 1px 2px rgba(0,0,0,.2); box-shadow: 0 1px 2px rgba(0,0,0,.2); } .contact-form-button:hover { text-decoration: none; } .contact-form-button:active { position: relative; top: 1px; }.TTH-btnLogin{-moz-border-radius:2px; -webkit-border-radius:2px;border-radius:15px;background:#a1d8f0;background:-moz-linear-gradient(top, #badff3, #7acbed);background:-webkit-gradient(linear, center top, center bottom, from(#badff3), to(#7acbed));-ms-filter: "progid:DXImageTransform.Microsoft.gradient(startColorStr='#badff3', EndColorStr='#7acbed')";border:1px solid #7db0cc !important;cursor:pointer; padding:11px 16px;font:bold 11px/14px Verdana, Tahomma, Geneva;text-shadow:rgba(0,0,0,0.2) 0 1px 0px;  color:#fff;-moz-box-shadow:inset rgba(255,255,255,0.6) 0 1px 1px, rgba(0,0,0,0.1) 0 1px 1px; -webkit-box-shadow:inset rgba(255,255,255,0.6) 0 1px 1px, rgba(0,0,0,0.1) 0 1px 1px;box-shadow:inset rgba(255,255,255,0.6) 0 1px 1px, rgba(0,0,0,0.1) 0 1px 1px; margin-center:12px; float:center; padding:7px 21px;}.TTH-btnLogin:hover,.btnLogin:focus,.btnLogin:active{background:#a1d8f0;background:-moz-linear-gradient(top, #7acbed, #badff3);background:-webkit-gradient(linear, center top, center bottom, from(#7acbed), to(#badff3));-ms-filter: "progid:DXImageTransform.Microsoft.gradient(startColorStr='#7acbed', EndColorStr='#badff3')";}.TTH-btnLogin:active{ text-shadow:rgba(0,0,0,0.3) 0 -1px 0px; }</style><!--[if IE 9]> <style> .contact-form-name { background: #FFF url(https://blogger.googleusercontent.com/img/b/R29vZ2xl/AVvXsEhY08XvX_iJmHPl9DQfxq2MNPVNQzjhXLzvXYu8Oz5aJfytyHNi9-wCuLPm1bS-Y-nJz2yO-D9wbEAa9CBj0YCar1BI64ieGixYqEYIQLWIbl62lhHv8tXRPPmhyVlvCBgeZFYp88RRMpg/s320/name.png) no-repeat 7px 0px; }.contact-form-email { background: #FFF url(https://blogger.googleusercontent.com/img/b/R29vZ2xl/AVvXsEhKRdXPw7KQ2J3qRkx_Etrm49SmolQEqlIuitAzgS4BV65T5aRkp2kaE8GJS5T7kXExhmCucqNWJp8vSUDXH9i-U_arzctNL02N5RH1zZwzCojURkxtQ0wtaRQEYaJ1CzEzgK8StNO7haY/s320/email.png) no-repeat 7px 6px; }</style> <![endif]--> <style> @media screen and (-webkit-min-device-pixel-ratio:0) {.contact-form-name { background: #FFF url(https://blogger.googleusercontent.com/img/b/R29vZ2xl/AVvXsEhY08XvX_iJmHPl9DQfxq2MNPVNQzjhXLzvXYu8Oz5aJfytyHNi9-wCuLPm1bS-Y-nJz2yO-D9wbEAa9CBj0YCar1BI64ieGixYqEYIQLWIbl62lhHv8tXRPPmhyVlvCBgeZFYp88RRMpg/s320/name.png) no-repeat 7px 6px; padding: 15px 15px 15px 28px;}.contact-form-email { background: #FFF url(https://blogger.googleusercontent.com/img/b/R29vZ2xl/AVvXsEhKRdXPw7KQ2J3qRkx_Etrm49SmolQEqlIuitAzgS4BV65T5aRkp2kaE8GJS5T7kXExhmCucqNWJp8vSUDXH9i-U_arzctNL02N5RH1zZwzCojURkxtQ0wtaRQEYaJ1CzEzgK8StNO7haY/s320/email.png) no-repeat 7px 8px; padding: 15px 15px 15px 28px;}.contact-form-email:hover, .contact-form-name:hover{ padding: 15px 15px 15px 28px; }.contact-form-button { height: 28px;}}</style>


Now Save it


Add Contact Form on Static Page


  • Login to Blogger > Dashborad
  • Click on Drop Down Menu and select Pages
  • Click on New Page 
  • Select Blank Page

add contact forum in blogger

  • Now Click on HTML an Paste below code in it.


<div class='form'> 
<!-- Custom Contact Form By TTH Starts -->
<form name='contact-form'>
<!-- Name Field -->
<input class='contact-form-name' id='ContactForm1_contact-form-name' name='name' value="Name" size='30' type='text' onblur='if (this.value == &quot;&quot;) {this.value = &quot;Name&quot;;}' onfocus='if (this.value == &quot;Name&quot;) {this.value = &quot;&quot;;}' /> 
<p></p>
<!-- Email ID Field -->
<input class='contact-form-email' id='ContactForm1_contact-form-email' name='email' value="Email ID"  size='30' type='text' onblur='if (this.value == &quot;&quot;) {this.value = &quot;Email ID&quot;;}' onfocus='if (this.value == &quot;Email ID&quot;) {this.value = &quot;&quot;;}'/> 
<p></p>
<!-- Message Field -->
<textarea class='contact-form-email-message'  id='ContactForm1_contact-form-email-message' name='email-message'  value='Leave Your Message..'  onblur='if (this.value == &quot;&quot;) {this.value = &quot;Leave Your Message..&quot;;}' onfocus='if (this.value == &quot;Leave Your Message..&quot;) {this.value = &quot;&quot;;}'></textarea> 
<p></p>
<!-- Clear Button --> 
<input class='TTH-btnLogin' type='reset' value='Clear'/> 
<!-- Send Button -->  
<input class='TTH-btnLogin' id='ContactForm1_contact-form-submit' type='button' value='Send'/> 
<p></p>
<!-- Validation --> 
<div style='text-align: center; max-width: 222px; width: 100%'> 
<p class='contact-form-error-message' id='ContactForm1_contact-form-error-message'></p> 
<p class='contact-form-success-message' id='ContactForm1_contact-form-success-message'></p> 
</div> 
</form>
<!-- Custom Contact Form By TTH Ends --> 
</div>


  • Now publish that page.


Hide Contact Form from Sidebar


Now here comes the part how to hide that contact form from sidebar or layout widget.
  • Login to Blogger > Dashborad
  • Click on Drop Down Menu and select Template
  • Backup your Template before making any changes to your blog.
Now search for  the id "ContactForm". expand the widget by clicking on the black arrow on the left (same with the includable) and then delete the part that I have colored in red (see below):


  • Part to be removed:


 <b:widget id='ContactForm1' locked='false' title='Contact Form' type='ContactForm'>
    <b:includable id='main'>
  <b:if cond='data:title != &quot;&quot;'>
    <h2 class='title'><data:title/></h2>
  </b:if>
  <div class='contact-form-widget'>
    <div class='form'>
      <form name='contact-form'>
        <p/>
        <data:contactFormNameMsg/>
        <br/>
        <input class='contact-form-name' expr:id='data:widget.instanceId + &quot;_contact-form-name&quot;' name='name' size='30' type='text' value=''/>
        <p/>
        <data:contactFormEmailMsg/> <span style='font-weight: bolder;'>*</span>
        <br/>
        <input class='contact-form-email' expr:id='data:widget.instanceId + &quot;_contact-form-email&quot;' name='email' size='30' type='text' value=''/>
        <p/>
        <data:contactFormMessageMsg/> <span style='font-weight: bolder;'>*</span>
        <br/>
        <textarea class='contact-form-email-message' cols='25' expr:id='data:widget.instanceId + &quot;_contact-form-email-message&quot;' name='email-message' rows='5'/>
        <p/>
        <input class='contact-form-button contact-form-button-submit' expr:id='data:widget.instanceId + &quot;_contact-form-submit&quot;' expr:value='data:contactFormSendMsg' type='button'/>
        <p/>
        <div style='text-align: center; max-width: 222px; width: 100%'>
          <p class='contact-form-error-message' expr:id='data:widget.instanceId + &quot;_contact-form-error-message&quot;'/>
          <p class='contact-form-success-message' expr:id='data:widget.instanceId + &quot;_contact-form-success-message&quot;'/>
        </div>
      </form>
    </div>
  </div>
  <b:include name='quickedit'/>

</b:includable>
  </b:widget>


  • Now save the template.
Blogger free blog publishing platform uses a pretty limited navigation features that only display “Older Posts” or “Newer Posts” link to let readers navigate and browse to other pages on homepage (index), archive, category and label pages. Unlike WordPress blog that supports plugin to customize the page navigation link to numbered pages listing to make it more user friendly, Blogger, whether hosted on blogspot.com or custom domain does not have such flexibility.


As shown in image above, a navigation link consists of page numbers, first page, last page, next page and previous page (when applicable) is display on Blogger blog instead of the usual “Older Items” and “Newer Items” text links.
To add the “new” navigation link with page number to Blogger blog, simply add in a new Page Element Gadget in the Blogger. To do so, follow the guide below:
  1. Login to Blogger account Dashboard.
  2. Click on the Layout link for the blog that you want to modify (if you’re viewing the blog and logged in to Blogger or Google Account, just click on Customize on the Next Blog toolbar.
  3. Go to Page Element tab (by default).
  4. Click on Add a Gadget anywhere in the layout.
  5. In the Add a Gadget window, select HTML/JavaScript.
  6. Add the following code into the Content text field. Title field can be left blank, or just type in any description such as “Page Navigation” to differentiate it from the rest of widgets.
    <style>
    .showpageArea {
    padding: 0 2px;margin-top:10px;margin-bottom:10px;
    }
    .showpageArea a {
    border: 1px solid #505050;
    color: #000000;font-weight:normal;
    padding: 3px 6px !important;
    padding: 1px 4px ;margin:0px 4px;
    text-decoration: none;
    }
    .showpageArea a:hover {
    font-size:11px;
    border: 1px solid #333;
    color: #000000;
    background-color: #FFFFFF;
    }
    .showpageNum a {
    border: 1px solid #505050;
    color: #000000;font-weight:normal;
    padding: 3px 6px !important;
    padding: 1px 4px ;margin:0px 4px;
    text-decoration: none;
    }
    .showpageNum a:hover {
    font-size:11px;
    border: 1px solid #333;
    color: #000000;
    background-color: #FFFFFF;
    }
    .showpagePoint {
    font-size:11px;
    padding: 2px 4px 2px 4px;
    margin: 2px;
    font-weight: bold;
    border: 1px solid #333;
    color: #fff;
    background-color: #000000;
    }
    .showpage a:hover {
    font-size:11px;
    border: 1px solid #333;
    color: #000000;
    background-color: #FFFFFF;
    }
    .showpageNum a:link,.showpage a:link {
    font-size:11px;
    padding: 2px 4px 2px 4px;
    margin: 2px;
    text-decoration: none;
    border: 1px solid #0066cc;
    color: #0066cc;
    background-color: #FFFFFF;}
    .showpageNum a:hover {
    font-size:11px;
    border: 1px solid #333;
    color: #000000;
    background-color: #FFFFFF;
    }
    </style>
    <script type=”text/javascript”>
    function showpageCount(json) {
    var thisUrl = location.href;
    var htmlMap = new Array();
    var isFirstPage = thisUrl.substring(thisUrl.length-14,thisUrl.length)==”.blogspot.com/”;
    var isLablePage = thisUrl.indexOf(“/search/label/”)!=-1;
    var isPage = thisUrl.indexOf(“/search?updated”)!=-1;
    var thisLable = isLablePage ? thisUrl.substr(thisUrl.indexOf(“/search/label/”)+14,thisUrl.length) : “”;
    thisLable = thisLable.indexOf(“?”)!=-1 ? thisLable.substr(0,thisLable.indexOf(“?”)) : thisLable;
    var thisNum = 1;
    var postNum=1;
    var itemCount = 0;
    var fFlag = 0;
    var eFlag = 0;
    var html= ”;
    var upPageHtml =”;
    var downPageHtml =”;
    var pageCount=5;
    var displayPageNum=3;
    var firstPageWord = ‘First’;
    var endPageWord = ‘Last’;
    var upPageWord =’Previous’;
    var downPageWord =’Next’;
    var labelHtml = ‘<span class=”showpageNum”><a href=”/search/label/’+thisLable+’?&max-results=’+pageCount+’”>’;
    for(var i=0, post; post = json.feed.entry[i]; i++) {
    var timestamp = post.published.$t.substr(0,10);
    var title = post.title.$t;
    if(isLablePage){
    if(title!=”){
    if(post.category){
    for(var c=0, post_category; post_category = post.category[c]; c++) {
    if(encodeURIComponent(post_category.term)==thisLable){
    if(itemCount==0 || (itemCount % pageCount ==(pageCount-1))){
    if(thisUrl.indexOf(timestamp)!=-1 ){
    thisNum = postNum;
    }
    postNum++;
    htmlMap[htmlMap.length] = ‘/search/label/’+thisLable+’?updated-max=’+timestamp+’T00%3A00%3A00%2B08%3A00&max-results=’+pageCount;
    }
    }
    }
    }//end if(post.category){
    itemCount++;
    }
    }else{
    if(title!=”){
    if(itemCount==0 || (itemCount % pageCount ==(pageCount-1))){
    if(thisUrl.indexOf(timestamp)!=-1 ){
    thisNum = postNum;
    }
    if(title!=”) postNum++;
    htmlMap[htmlMap.length] = ‘/search?updated-max=’+timestamp+’T00%3A00%3A00%2B08%3A00&max-results=’+pageCount;
    }
    }
    itemCount++;
    }
    }
    for(var p =0;p< htmlMap.length;p++){
    if(p>=(thisNum-displayPageNum-1) && p<(thisNum+displayPageNum)){
    if(fFlag ==0 && p == thisNum-2){
    if(thisNum==2){
    if(isLablePage){
    upPageHtml = labelHtml + upPageWord +’</a></span>’;
    }else{
    upPageHtml = ‘<span class=”showpage”><a href=”/”>’+ upPageWord +’</a></span>’;
    }
    }else{
    upPageHtml = ‘<span class=”showpage”><a href=”‘+htmlMap[p]+’”>’+ upPageWord +’</a></span>’;
    }
    fFlag++;
    }
    if(p==(thisNum-1)){
    html += ‘&nbsp;<span class=”showpagePoint”><u>’+thisNum+’</u></span>’;
    }else{
    if(p==0){
    if(isLablePage){
    html = labelHtml+’1</a></span>’;
    }else{
    html += ‘<span class=”showpageNum”><a href=”/”>1</a></span>’;
    }
    }else{
    html += ‘<span class=”showpageNum”><a href=”‘+htmlMap[p]+’”>’+ (p+1) +’ </a></span>’;
    }
    }
    if(eFlag ==0 && p == thisNum){
    downPageHtml = ‘<span class=”showpage”> <a href=”‘+htmlMap[p]+’”>’+ downPageWord +’</a></span>’;
    eFlag++;
    }
    }//end if(p>=(thisNum-displayPageNum-1) && p<(thisNum+displayPageNum)){
    }//end for(var p =0;p< htmlMap.length;p++){
    if(thisNum>1){
    if(!isLablePage){
    html = ‘<span class=”showpage”><a href=”/”>’+ firstPageWord +’ </a></span>’+upPageHtml+’ ‘+html +’ ‘;
    }else{
    html = ”+labelHtml + firstPageWord +’ </a></span>’+upPageHtml+’ ‘+html +’ ‘;
    }
    }
    html = ‘<div class=”showpageArea”><span style=”font-size:11px;padding: 2px 4px 2px 4px;margin: 2px 2px 2px 2px;color: #000000;border: 1px solid #333; background-color: #FFFFFF;” class=”showpage”>Page ‘+thisNum+’ of ‘+(postNum-1)+’: </span>’+html;
    if(thisNum<(postNum-1)){
    html += downPageHtml;
    html += ‘<span class=”showpage”><a href=”‘+htmlMap[htmlMap.length-1]+’”> ‘+endPageWord+’</a></span>’;
    }
    if(postNum==1) postNum++;
    html += ‘</div>’;
    if(isPage || isFirstPage || isLablePage){
    var pageArea = document.getElementsByName(“pageArea”);
    var blogPager = document.getElementById(“blog-pager”);
    if(postNum <= 2){
    html =”;
    }
    for(var p =0;p< pageArea.length;p++){
    pageArea[p].innerHTML = html;
    }
    if(pageArea&&pageArea.length>0){
    html =”;
    }
    if(blogPager){
    blogPager.innerHTML = html;
    }
    }
    }
    </script>
    <script src=”/feeds/posts/summary?alt=json-in-script&callback=showpageCount&max-results=99999″ type=”text/javascript”></script>
  7. Click Save button.
  8. Drag and drop the newly added HTML/JavaScript gadget to directly right below the Blog Posts element.
  9. Click on Save button to make the change effective.
For user who don’t want to use the Page Element widget or gadget, it’s possible to manually editing the HTML file, although it’s more difficult to do and should only be tried by blogger with technical expertise.
  1. Login to Blogger account Dashboard.
  2. Click on the Layout link for the blog that you want to modify (if you’re viewing the blog and logged in to Blogger or Google Account, just click on Customize on the Next Blog toolbar.
  3. Go to Edit HTML tab (there is no need to expand widget templates).
  4. Search for the following line:]]></b:skin>
  5. Copy the following CSS code and paste or append the code above the line: .showpageArea {
    padding: 0 2px;margin-bottom:10px;margin-top:10px;
    }

    .showpageArea a {
    border: 1px solid #505050;
    color: #000000;font-weight:normal;
    padding: 3px 6px !important;
    padding: 1px 4px ;margin:0px 4px;
    text-decoration: none;
    }

    .showpageArea a:hover {
    font-size:11px;
    border: 1px solid #333;
    color: #000000;
    background-color: #FFFFFF;
    }

    .showpageNum a {
    border: 1px solid #505050;
    color: #000000;font-weight:normal;
    padding: 3px 6px !important;
    padding: 1px 4px ;margin:0px 4px;
    text-decoration: none;
    }

    .showpageNum a:hover {
    font-size:11px;
    border: 1px solid #333;
    color: #000000;
    background-color: #FFFFFF;
    }

    .showpagePoint {
    font-size:11px;
    padding: 2px 4px 2px 4px;
    margin: 2px;
    font-weight: bold;
    border: 1px solid #333;
    color: #fff;
    background-color: #000000;
    }

    .showpage a:hover {
    font-size:11px;
    border: 1px solid #333;
    color: #000000;
    background-color: #FFFFFF;
    }

    .showpageNum a:link,.showpage a:link {
    font-size:11px;
    padding: 2px 4px 2px 4px;
    margin: 2px;
    text-decoration: none;
    border: 1px solid #0066cc;
    color: #0066cc;
    background-color: #FFFFFF;
    }

    .showpageNum a:hover {
    font-size:11px;
    border: 1px solid #333;
    color: #000000;
    background-color: #FFFFFF;
    }

  6. Next, search for the following line of code in the template’s HTML code: <b:section class='main' id='main' showaddelement='no'>
    <b:widget id='Blog1' locked='true' title='Blog Posts' type='Blog'/>
    </b:section>

    Note: The ‘no’ after “showaddelement” can be ‘yes’ for some bloggers.
  7. Add and append the following JavaScript code right after the </b:section> line:
    &lt;script type=&quot;text/javascript&quot;&gt;
    function showpageCount(json) {
    var thisUrl = location.href;
    var htmlMap = new Array();
    var isFirstPage = thisUrl.substring(thisUrl.length-14,thisUrl.length)==&quot;.blogspot.com/&quot;;
    var isLablePage = thisUrl.indexOf(&quot;/search/label/&quot;)!=-1;
    var isPage = thisUrl.indexOf(&quot;/search?updated&quot;)!=-1;
    var thisLable = isLablePage ? thisUrl.substr(thisUrl.indexOf(&quot;/search/label/&quot;)+14,thisUrl.length) : &quot;&quot;;
    thisLable = thisLable.indexOf(&quot;?&quot;)!=-1 ? thisLable.substr(0,thisLable.indexOf(&quot;?&quot;)) : thisLable;
    var thisNum = 1;
    var postNum=1;
    var itemCount = 0;
    var fFlag = 0;
    var eFlag = 0;
    var html= &#39;&#39;;
    var upPageHtml =&#39;&#39;;
    var downPageHtml =&#39;&#39;;
    var pageCount=5;
    var displayPageNum=3;
    var firstPageWord = &#39;First&#39;;
    var endPageWord = &#39;Last&#39;;
    var upPageWord =&#39;Previous&#39;;
    var downPageWord =&#39;Next&#39;;
    var labelHtml = &#39;&lt;span class=&quot;showpageNum&quot;&gt;&lt;a href=&quot;/search/label/&#39;+thisLable+&#39;?&amp;max-results=&#39;+pageCount+&#39;&quot;&gt;&#39;;
    for(var i=0, post; post = json.feed.entry[i]; i++) {
    var timestamp = post.published.$t.substr(0,10);
    var title = post.title.$t;
    if(isLablePage){
    if(title!=&#39;&#39;){
    if(post.category){
    for(var c=0, post_category; post_category = post.category[c]; c++) {
    if(encodeURIComponent(post_category.term)==thisLable){
    if(itemCount==0 || (itemCount % pageCount ==(pageCount-1))){
    if(thisUrl.indexOf(timestamp)!=-1 ){
    thisNum = postNum;
    }
    postNum++;
    htmlMap[htmlMap.length] = &#39;/search/label/&#39;+thisLable+&#39;?updated-max=&#39;+timestamp+&#39;T00%3A00%3A00%2B08%3A00&amp;max-results=&#39;+pageCount;
    }
    }
    }
    }//end if(post.category){
    itemCount++;
    }
    }else{
    if(title!=&#39;&#39;){
    if(itemCount==0 || (itemCount % pageCount ==(pageCount-1))){
    if(thisUrl.indexOf(timestamp)!=-1 ){
    thisNum = postNum;
    }
    if(title!=&#39;&#39;) postNum++;
    htmlMap[htmlMap.length] = &#39;/search?updated-max=&#39;+timestamp+&#39;T00%3A00%3A00%2B08%3A00&amp;max-results=&#39;+pageCount;
    }
    }
    itemCount++;
    }
    }
    for(var p =0;p&lt; htmlMap.length;p++){
    if(p&gt;=(thisNum-displayPageNum-1) &amp;&amp; p&lt;(thisNum+displayPageNum)){
    if(fFlag ==0 &amp;&amp; p == thisNum-2){
    if(thisNum==2){
    if(isLablePage){
    upPageHtml = labelHtml + upPageWord +&#39;&lt;/a&gt;&lt;/span&gt;&#39;;
    }else{
    upPageHtml = &#39;&lt;span class=&quot;showpage&quot;&gt;&lt;a href=&quot;/&quot;&gt;&#39;+ upPageWord +&#39;&lt;/a&gt;&lt;/span&gt;&#39;;
    }
    }else{
    upPageHtml = &#39;&lt;span class=&quot;showpage&quot;&gt;&lt;a href=&quot;&#39;+htmlMap[p]+&#39;&quot;&gt;&#39;+ upPageWord +&#39;&lt;/a&gt;&lt;/span&gt;&#39;;
    }
    fFlag++;
    }
    if(p==(thisNum-1)){
    html += &#39;&amp;nbsp;&lt;span class=&quot;showpagePoint&quot;&gt;&lt;u&gt;&#39;+thisNum+&#39;&lt;/u&gt;&lt;/span&gt;&#39;;
    }else{
    if(p==0){
    if(isLablePage){
    html = labelHtml+&#39;1&lt;/a&gt;&lt;/span&gt;&#39;;
    }else{
    html += &#39;&lt;span class=&quot;showpageNum&quot;&gt;&lt;a href=&quot;/&quot;&gt;1&lt;/a&gt;&lt;/span&gt;&#39;;
    }
    }else{
    html += &#39;&lt;span class=&quot;showpageNum&quot;&gt;&lt;a href=&quot;&#39;+htmlMap[p]+&#39;&quot;&gt;&#39;+ (p+1) +&#39; &lt;/a&gt;&lt;/span&gt;&#39;;
    }
    }
    if(eFlag ==0 &amp;&amp; p == thisNum){
    downPageHtml = &#39;&lt;span class=&quot;showpage&quot;&gt; &lt;a href=&quot;&#39;+htmlMap[p]+&#39;&quot;&gt;&#39;+ downPageWord +&#39;&lt;/a&gt;&lt;/span&gt;&#39;;
    eFlag++;
    }
    }//end if(p&gt;=(thisNum-displayPageNum-1) &amp;&amp; p&lt;(thisNum+displayPageNum)){
    }//end for(var p =0;p&lt; htmlMap.length;p++){
    if(thisNum&gt;1){
    if(!isLablePage){
    html = &#39;&lt;span class=&quot;showpage&quot;&gt;&lt;a href=&quot;/&quot;&gt;&#39;+ firstPageWord +&#39; &lt;/a&gt;&lt;/span&gt;&#39;+upPageHtml+&#39; &#39;+html +&#39; &#39;;
    }else{
    html = &#39;&#39;+labelHtml + firstPageWord +&#39; &lt;/a&gt;&lt;/span&gt;&#39;+upPageHtml+&#39; &#39;+html +&#39; &#39;;
    }
    }
    html = &#39;&lt;div class=&quot;showpageArea&quot;&gt;&lt;span style=&quot;font-size:11px;padding: 2px 4px 2px 4px;margin: 2px 2px 2px 2px;color: #000000;border: 1px solid #333; background-color: #FFFFFF;&quot; class=&quot;showpage&quot;&gt;Page &#39;+thisNum+&#39; of &#39;+(postNum-1)+&#39;: &lt;/span&gt;&#39;+html;
    if(thisNum&lt;(postNum-1)){
    html += downPageHtml;
    html += &#39;&lt;span class=&quot;showpage&quot;&gt;&lt;a href=&quot;&#39;+htmlMap[htmlMap.length-1]+&#39;&quot;&gt; &#39;+endPageWord+&#39;&lt;/a&gt;&lt;/span&gt;&#39;;
    }
    if(postNum==1) postNum++;
    html += &#39;&lt;/div&gt;&#39;;
    if(isPage || isFirstPage || isLablePage){
    var pageArea = document.getElementsByName(&quot;pageArea&quot;);
    var blogPager = document.getElementById(&quot;blog-pager&quot;);
    if(postNum &lt;= 2){
    html =&#39;&#39;;
    }
    for(var p =0;p&lt; pageArea.length;p++){
    pageArea[p].innerHTML = html;
    }
    if(pageArea&amp;&amp;pageArea.length&gt;0){
    html =&#39;&#39;;
    }
    if(blogPager){
    blogPager.innerHTML = html;
    }
    }
    }
    &lt;/script&gt;
    &lt;script src=&quot;/feeds/posts/summary?alt=json-in-script&amp;callback=showpageCount&amp;max-results=99999&quot; type=&quot;text/javascript&quot;&gt;&lt;/script&gt;
  8. Click on Preview button to ensure that no code error been found. No effect on the navigation hack can be seen though.
  9. Click on Save Template to save the change.
Customization and Modification
  1. For user who is not using blogspot.com domain (using self-hosted domain name), modify the .blogspot.com and 14 (13 characters of domain name + 1) in the line of var isFirstPage = thisUrl.substring(thisUrl.length-14,thisUrl.length)==&quot;.blogspot.com/&quot;; accordingly.
  2. The value in the line of var pageCount =5; determines the number of posts to be shown on each page.
  3. The value in the line of var displayPageNum = 3; defines the number of page links in the navigation bar to be displayed (e.g. 1 – 2 – 3).
  4. User who knows CSS and Java Script can customize the code to their likings.

Tuesday, 20 August 2013

Adding Custom Robots.Txt to Blogger

Now the main part of this tutorial is how to add custom robots.txt in blogger. So below are steps to add it.
  1. Go to your blogger blog.
  2. Navigate to Settings >> Search Preferences ›› Crawlers and indexing ›› Custom robots.txt ›› Edit ›› Yes
  3. Now paste your robots.txt file code in the box.
  4. Click on Save Changes button.
  5. You are done!

How to Check Your Robots.txt File?

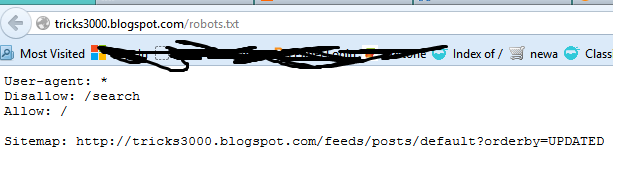
You can check this file on your blog by adding /robots.txt at last to your blog URL in the browser. Take a look at the below example for demo.
http://www.tricks3000.blogspot.com/robots.txt
Once you visit the robots.txt file URL you will see the entire code which you are using in your custom robots.txt file. See below image.


Step 1: To enable these tags, Go To Blogger > Settings > Search Preferences, click Edit next to "Custom robots header tags," and select Yes. Activated!

Now you must learn when should you use them. Using them correctly can help you rank better and using them at wrong scenarios can surely going to opposite.

all:-  There are no restrictions for indexing or serving. This is default for all pages
noindex:-  Do not show this page in search results and do not show a "Cached" link in search results.
nofollow:-  Do not follow the links on this page
none:-  Equivalent to noindex, nofollow
noarchive:-  Do not show a "Cached" link in search results.
nosnippet:-  Do not show a snippet in the search results for this page
noodp:-  Do not use metadata from the Open Directory project (DMOZ) for titles or snippets shown for this page.
notranslate:-  Do not offer translation of this page in other languages in search results.
noimageindex:-  Do not index images on this page.
unavailable_after:- [RFC-850 date/time]: Do not show this page in search results after the specified date/time. The date/time must be specified in the RFC 850 format. Example: 17 May 2012 15:00:00 PST.

Step 2: After Learning Above Meaning Lets Start Setting.

Settings For Custom Robots Header Tag

noodp ?

This command instruct Google not to use the meta data from DMoz for showing up the images and snippets of your website in Google search engine result pages.

"noindex" and "nofollow"?

"noindex" command restrict search engines to show a page in search engine result pages, not even cached link to that page also. Any page or post that you want to hide from robots and visitors can be tagged as noindex. Visitors wont be able to discover that page via search engines or may be even with the Google Custom Search Engine.
The "nofollow" command instruct not to follow the link of a page. The "none" command is similar to "noindex" and "nofollow".

"noarchive" and "notranslate"?

The "noarchive" command restrict search engine to show cached link of a web page. Where the "notranslate" command disable the translation of a page in search results.

noimageindex ?

If you are sharing your Project  or Personal Picture on any of your posts or page then may be you would prefer not to make those pictures public and keep them limited to readers reach only.

all ?

This command means there are no restrictions for indexing and serving anything from a webpage.
What is the work of "unavailable_after"?
The command instruct the search engine that remove the page from the search results after a specific time period.

If you do not want to do the settings you can leave it as disable mode in default, you can get the better effect with your site SEO but it is an advanced mode for your Site. It will make more effective with your site content and make it make high rank from other blogger BlogSpot. I would really appreciate you to use it for your Blog
If you have original and SEO friendly content in your blog, then no doubt you can surely get high ranking in search results. Writing SEO friendly blog posts is not much tough as beginners think. We just need to focus on some places where we can add keywords in our blog posts to make them optimized for search engines. Don’t forget, optimizing blog posts for search engines is not mean to compromise with content quality. We have to add keywords in a proper way so that it looks natural for our readers and for search engines too. I’ll outline 6 best locations to add keywords in blogger blog posts. Hope you would like to know them.


Optimize Blog Posts By Adding Keywords Smartly

Before I cover today’s topic, you must need to know that adding too much keywords in blog posts is not good for our blog health. We should keep it’s density below 3% for better optimization of our blog posts.
The locations I’m going to tell you to add keywords are the safest and best locations of our blog area. If you want to get your blog posts rank high in search results, then don’t miss to target below locations:

1# Starting and Ending Para of Content

Whenever you write new post for your blog, always remember to add your main keyword in first and last paragraph of your content’s. Both the locations are best for this purpose and search engines also look for keywords in these two places to decide the ranking of our blog posts.
We can add more targeted words in the form of phrases between the content to make it more SEO friendly.
Note: Don’t use same words again and again. Better to use multiple and relevant words. Using multiple related word not only protect our content from keyword stuffing penalty but also help it to appear high with multiple search terms. 

2# Image Name, Alt Tag and Title Tag

We all know that images plays best role in explanation of the topic. But using images we can also optimize our blog posts even better.
We just need to optimize our images before inserting them into our posts. The better we optimize the images, the better our posts will optimize for search engines. Read below mentioned post to know best 6 ways to optimize images.
If we talk about adding targeted words in blog posts using images, then let me tell you that image’s name, title tag and alt tag are the best and prominent places.

3# Title Of Our Posts

Our post titles are the top most places to add our targeted keywords. You may listen that we should use catchy post titles to attract more readers. But with catchy post titles we should also remember to add our keywords there.
Meaningful post titles grab more audience. Not only from social sharing sites, but from search engines too.
So, always try to use meaningful and catchy post titles to boost your posts traffic.

4# Permalink of Posts

Permalink is the URL of our blog posts. It’s a killer location to add really targeted keywords.
By default, permalinks create on the basis of our post’s titles. But we can use our custom permalinks to add our keywords.
To add custom permalinks go to your Post Editor > click on Permalink from the right side menu and choose Custom Permalink. Add your main keywords there and press Done button.
optimize blog posts
Note: Always try to use only targeted keywords in permalinks. Other non important words should be ignored.

5# Post Labels

Post labels not only used to categorize our blog posts. If used smartly then we can take their benefits to optimize our blog posts too.
Stop using non keyword rich names for your labels. Named them correctly and put your really targeted words there.
If you had forgetten to insert your keywords in label’s name, then don’t worry. We can rename them too. 

6# Post Comments
Many bloggers are unaware with this trick that we can use our blog comments too to add some keywords in our blog posts.
Yes, you heard it right. There are lot of benefits of blog comments and if we use them effectively then no doubt we can get higher ranking in search results.
Whenever you reply your reader’s comment on your blog, try to add some keyword phrases in your reply in a natural way that looks obvious while reading.
Note: Instead of adding your focused words try to use some long tail keywords in your comment section. In that way you can improve your keywords ranking 
We all know that we should optimize our blog posts to rank well in search engine that help us to increase our blog traffic but today I will tell you how to use images for better search engine visibility. Every blogger either using blogger platform or wordpress platform, they must optimize their images while using them into their blog posts before publishing the post. Image optimization really works to improve blog traffic. Lots of webmasters search images from Google Image Search to use them into their blog posts. So, if you have well optimized images into your blog post then it will give you two benefits. One is bring traffic from image search and second is it help web crawlers to better understand your post topic hence higher SERP (Search Engine Result Position). Let’s go to the tutorial to learn some helpful tips about image optimization for SEO.

Image Optimization Tips

Below are some very important tips to optimize images before uploading them into blog posts. These tips will improve your blog SEO

Use Keywords in Image Name

Have you download an image from internet or click them from your camera to use them into your blog posts? Yes! Wait buddy don’t use them directly into your blog. First change their name into a keyword rich image name. By default image name look like this image1432.jpg or photo123.jpg. Always rename them with your post keyword. For example if I use any image for this post then I’ll rename my image like this image-optimization.jpg.

Hyphen in Image Name

Remember when naming your images with your keywords neither use blank space nor underscore ( _ ) between them. Always use hyphen to separate the keywords like I have done in the first example. Because when your use blank space it will automatically convert to ‘%20‘ which have no meaning. In result web crawlers found difficulty to understand the image. Hyphen is always a better option for optimizing the image.

Use Best Format

There are lot of formats of images like JPG, PNG, GIF and others. But always use that image format which suits better for web. JPG image format is the most preferable image format by the webmasters because it uses less size memory as compare to other formats. Less image size will help you to reduce blog load time and hence better search engine ranking means more traffic.

Compress Images

Before uploading the images into your blog post, first remember that you have compressed them. Compressing the image also help to make your blog loading speed faster and reduce blog bounce rate. You can compress your images in Photoshop. To compress your image in Photoshop go to file menuand click on save for web. It will reduce image size by maintaining the image quality.
Also you can use online tools to compress your image files. One of the best tool is Yahoo Smush it. Go for it and compress your images for free.

How to Use Images in Blog Post for Better Search Engine Visibility?

Now you have optimized your images. It’s time to use them into your blog posts. Below are some advance tips that also come under image optimization in SEO. Read them carefully and follow the instructions.

Proper Dimension

When you upload your images into blog post, always give them proper dimensions. Mentioning the dimensions help in faster page loading. Web crawlers don’t get confuse to assume its width and height. If you already give dimensions to your image, then it will be easier for web crawlers to better crawl your content. Use below format to give dimensions to your image.
width=”320″ height=”210″ src=”URL of image”/>
Change above highlighted values according to your need.

Title Tag and Alt Tag

Title tag and Alt tag works as a description for your images. Web crawlers can’t read images. They only understand them by their name, title tag and Alt tag. Always choose your best keyword to give title and alt tag for your image. To use these tags see the below example.
title=”Keyword” alt=”Keyword”/>
Note: Don’t add too many keywords in these tags. Only put your best keyword there which better explain your post topic. 
Post titles and blog title plays a vital role for better ranking in search results. This is the first thing which is checked by visitors to either they should click on this link or not. That means your traffic depends on this thing. Keyword rich titles can bring you more traffic and increase your blog page views. Google shows only first 66 characters of the title in search results. That’s why we should use them effectively. By default, in blogger, our blog title shows before post title. This reduces the SEO benefits because our post titles which have the main keywords got chopped because of the characters limit in search results. So, to take the proper benefits we have to optimize our blog so that post titles shows before blog title in search results. 


Show Post Title First in Search Results

  1. Go to Blogger >> Template >> Edit HTML.
  2. Backup your blog template. 
  3. Now search below code in your template.
  4. Replace that code with the below one.


  5. You are done!
Now wait for the update in search results. Once search results got updated you will see the changes. 

There is a debate from long time about WordPress and Blogger that which is better for Search Engine Optimization. WordPress users says that it is the best and blogger users say that why we pay for hosting if we have a free service provided by Google itself. Most of the wordpress users say that blogger is not SEO friendly. This is not true. We can optimize blogspot blogs also to make them SEO friendly for better search engine results. In this blog, I have shared lot of tips and tricks for blogger users to optimize their blog for better ranking. Today I am going to share all those tips here so that you can read all of them at a time and optimize your blogspot blog fast. 


Blogger Optimization for SEO


  1. One of the main reasons your blog is not ranking well in search engines is that you may are using blogger’s default templates. Don’t go with them. In this post I explained why we should not use default templates and how to change them with a SEO friendly template.

  2. How To Remove Blogger Navbar?: We can’t ignore this step if we want to optimize blogger blog. Optimization is not only for search engines. We should optimize our blog for readers also. Our blog’s look plays a vital role in its reputation. In blogger templates there is an ugly navbar at the top and in this post I shared a trick to remove it. Either you are using blogger’s official templates or any third party template, you must know how to remove navbar because this is the basic knowledge that every blogger should know.

  3.  Checking the real and accurate stats of the traffic we are receiving on our blog is very important to optimize it because it shows the visitors behavior on our blog that tells about our blog performance. We can optimize our blog according to that. Read this post to know about this issue in details.

  4. Replace Blogger Home, Newer & Older Post Link With Image: This is the main part of blogspot optimization. By default in blogger templates there is a page navigation (also known as pagination) below every post which is not so much eye catching that can attract the readers toread more posts. Changing those navigation links with image can help you to increase your blog page views.

  5. Custom Robots Header Tags Settings in Blogger: Blogspot platform is now going SEO friendly with each update. After the release of blogger’s new interface, some more features are added by blogger developers to make enhance its performance in search engines. Custom Robots Header Tags is one of the new features. You must set these tags for your blog.

  6. Show Post Title Before Blog Title in Blogger: This is one of the major parts of blogger optimization guide. Title of a page should be optimized with best keywords. Our post titles should come first than blog title but in blogger this structure is in reverse order. You must optimize your blogger blog post titles. Read this post for explained tutorial. 
Writing content for blog is not enough to rank well in search engines like Google. We need some special care to make our blog SEO friendly. Then it will rank awesomely in all major search engines. In my previous posts, I shared some Off page SEO Tips that are beneficial to improve keywords position in search results. As you may already know that we must focus on On Page and Off Page SEO Techniques both to make our blog SEO friendly and search engines lovable. That’s why today I bring some tips that will help you to rank well in search results. Hope you guys like to read these tips.


Improve Keywords Position in Search Results

There are many things that we must care during blogging. Read below points and try to follow them to improve your blog traffic through search engines.

Tip #1 Optimize Post Titles

During writing new post for your blog, always tries to use SEO friendly post titles because this is the first thing that decides your ranking in search results.
Include your main and targeted keyword in your post title. If you are a blogger use then read below tutorial to optimize your post titles.

Tip #2 Add Keywords to Content

Provide best quality content in your blog and add some keywords into it at prominent places that fits there.
Keyword density should be kept in mind to make content for SEO friendly. Use at most 2% or 3% keywords in your content.
For example if you have 500 words in your article, then you can use your keyword 10 to 15 times.

Tip #3 Add Keywords to Images

Images not only use to make blog posts more attractive. They can also be used as an extra place to put keywords into it.
There are some image optimization tips that you must know to optimize your images. Read below tutorial to know about this topic in details.

Tip #4 Add Keyword Rich Labels

Labels are used to categorize blog posts. They used by related posts widget also to show related posts under every post. But if you used them correctly then you can take its benefit to improve your keywords ranking in Google.
Always add a keyword rich label name to every post you publish on your blog because it is also a best place to put keywords.

If you have already added some labels without adding keywords into it then don’t worry, you can rename it also.

This is the part of On-Page SEO Tips, now continue reading for some Off-page SEO Tips. These tips are also beneficial to improve keywords ranking in search results.

Tip #5 Use Guest Blogging

Guest Blogging is the best method to gain high quality keyword rich dofollow backlinks. If you don’t know about importance of backlinks in search rankings then let me tell you that quality backlinks are very important for every blog or website to improve search rankings.
Use guest blogging to increase number of keyword rich backlinks of your blog. Write high quality content and submit it to other blogs under your niche. It will also help to increase your blog page views and readers.

Tip #6 Blog Commenting
You might think that why waste time to leave comments on other’s blog. This is the big mistake that newbie bloggers do.
You should participate in the conversation on other blog’s by leaving a valuable comment. It will not only introduce you and your blog into the blog-o-sphere but also you will get quality backlinks for your blog.
Don’t waste your time to leave comments on random blogs. You must target KeywordLuv andCommentLuv enabled blogs to gain dofollow backlinks. If you don’t have any idea about that then read below tutorial.

Tip #7 Social Bookmarking
Social Bookmarking is the part of Off-Page SEO Techniques. It helps a lot to improve keywords ranking in Google.
There are some tips and suggestions for those bloggers who want to participate in social bookmarking to increase their rankings in search results.

Tip #8 Directory Submissions
As same as social bookmarking, directory submission with care can also help blog owners to make their blog popular in search results.
There are also some points for directory submission that you must know to take proper benefits of your hard work.